The main component of a Windows application is the form. A Windows application may consist of a single form, or many forms. The form is the organizational "container" for the controls (i.e. control objects) for a given application. When a Windows application is selected as the type of .Net project, the form design window, the toolbox as well as the properties windows will be displayed (recall).
As mentioned, the central component of a Windows application is a form object. A form consists of the form object itself, as well as any other control objects that are added to it. A form is a control, albeit a unique one, since forms are the only control objects that do not come from the toolbox.
As mentioned previously, controls are objects and an object's behaviors/attributes are manipulated via their properties. All objects share two important properties; the Name property and the Text property. Remember also that the Name property is for the programmer, while the Text property is for the user (recall).
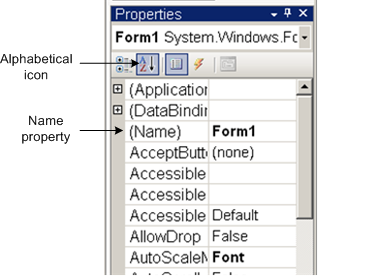
As with variables, control objects should also be named using prefixes (see a list of prefixes here). The prefix for a form should be frm. As with all control objects, forms should be named using the Name property in the properties window. The default Name property assigned to the (first) form at VB start-up is Form1, as in the diagram below:
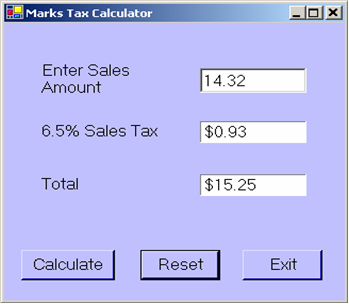
The name "Form1" is neither descriptive nor useful, and should be given a more descriptive name. For the application shown in the diagram above, one might use the name frmTaxCalc (recall the naming conventions). The Text property for a form is the text that will be displayed in the Title bar (see the application above). As with all properties, it is set in the Properties Window (scroll down until you see the Text property). You can also resize the form by dragging the sizing handles until the desired shape is reached.
 I find it useful to organize the properties listing alphabetically which enables me to find the property I am
looking for easier. You can do this by clicking the Alphabetical icon on the properties window, as indicated in the diagram
above. Note, even when listed alphabetically, the Name property still appears near the top of the list!
I find it useful to organize the properties listing alphabetically which enables me to find the property I am
looking for easier. You can do this by clicking the Alphabetical icon on the properties window, as indicated in the diagram
above. Note, even when listed alphabetically, the Name property still appears near the top of the list!All control objects, other than forms, will be retrieved from the toolbox. To instantiate a control object, simply double-click the control object you wish to include in your form. Alternatively, you can select, then drag and drop the control onto the form. Once located on the form, control objects can be sized and moved as desired.
One often used control object is a Label object. Labels are used for displaying descriptive text about the application, or about other controls in the application. Labels are retrieved from the toolbox. Labels should be Named with the prefix lbl, followed by a descriptive name indicating what the control is being used for. Note, Label1 is not a descriptive name. The Text property of a Label is the text that will be displayed in the label control when the application is run. The text "6.5% Sales Tax" in the application above is the Text property of a Label. Font, font size, and color are other, commonly set properties of Labels.
Another common control object is a TextBox object. TextBoxes enable the user to enter text (as String type data). TextBoxes are also retrieved from the toolbox. TextBoxes should be Named with the prefix txt, followed by a descriptive name indicating what the control is being used for. As above, TextBox1 is not a descriptive name. The Text property of a TextBox is the text that is displayed in the TextBox when the application is run. For TextBoxes, the Text property is often empty, since TextBoxes are usually used for accepting input. The control object containing the text "14.32" in the application above is a TextBox1.
Yet another common control object is a Button object. Buttons are used for initiating actions (e.g. events) when the user clicks it. Buttons should be Named with the prefix btn, followed by a descriptive name indicating what the control is being used for. The Text property of a Button is the text that will be displayed on the face of the button. The control objects containing the text "Calculate", "Reset", and "Exit" in the application above are Buttons.
There are a numerous variety of controls that are available within the VB programming environment; in fact, there are too many to describe in detail in any text. Having stated this, no reason to panic. When one encounters a new control object, always ask yourself "what properties do I need to set to use this control?" All one needs to do is to determine the set of required properties, and that is it.
1 The objects in the above application containing the text "$0.93" and
"$15.25" may look like TextBoxes, but they are actually Labels, with their properties set to appear like TextBoxes.
This prevents a user from entering values for the Tax Amount or the Total.
An event (in a programming context) is a user initiated action that causes some resulting program action(s)
to occur. For example, when you are in a text editing program, and you press the s key, the letter s appears
in your document. The key-press is the user generated event, and the appearance of the letter s is the resulting
action. Another example is when you move your mouse, the mouse pointer on the screen moves. The mouse movement is
the event, and the pointer moving is the resulting action.
As we are now acutely aware, controls in VB are objects, instantiated from classes. When an object is instantiated,
it is created such that events are associated with it. That is, a set of actions that can be performed on or to that
object. For example, when a button object is instantiated, the default (or most common) event associated with it
is a "click". That is, buttons can be clicked. TextBox objects can have text changed, CheckBox objects can be checked,
etc. When you click a button, you most likely expect something (some event) to happen. For example, in the Windows
application at the top of this page, should you click the button labeled "Exit", you should then
expect the application to exit or end. The resulting action associated with that object's click event was to
terminate the program.
In Visual Basic, the program code which causes the resulting action is located in an event procedure. An
event procedure is the "mechanism" that allows code to execute when an event happens (that is said to be triggered
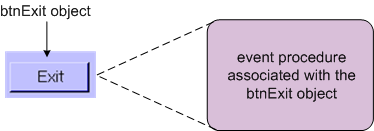
or fired) for a given object. Event procedures have binding relationships which "connect" them to the object which
will trigger the event, as in the picture below:
When the Exit button is pressed (i.e. clicked), the VB code that is present within the associated event procedure
will be executed.
Not every object in a VB program needs to have an event associated with it. Only objects which are required to
initiate action need to have event procedures associated with them. For example, Labels and TextBoxes
frequently do not have event procedures associated with them, whereas Buttons always do.
Event procedures are created at development time by simply double-clicking the control object they are going to be
associated with. Note this implies the control object must be instantiated prior to creating a connected event
procedure. In general, an event procedure will look like:
Keep in mind the association between objects and their event procedures. Either one can be individually deleted,
without deleting the other. If you delete the control object, you have an event procedure with no mechanism to be
triggered; if you delete the event procedure, you have an object with no action associated with it. If you have
created something erroneously, make sure you delete both pieces. To delete an event procedure, highlight it and press
the Delete key.
We have discussed control objects and the setting of their attributes using properties. There are 2 ways (or times or
places) where we do this:
We have informally used the term method several places earlier in this text. More formally, a method is an
abstract procedure (grouping of code) used to perform a specific task. Methods are associated either with a class
(called class methods) or with an object (called instance methods). An example of a method we have used is the
Console.WriteLine () method. The WriteLine () method is a class method belonging to the Console (more correctly, the
System.Console) class. Other members of this class we have seen are the Write as well as the ReadLine methods.
Another class of methods we have used previously is the the Convert class, which performs conversion from one base
data type to another base data type. The class members mentioned being .ToInt32, .ToDecimal, etc.
Another useful method you will use frequently is the Close () method which belongs to the form class. The
Close () method is most often used to close a form, and nicely terminate an application1.
General syntax of the Close () method is:
A plethora of methods exist for most every class and object. Rather than documenting any here, I will merely say
that these will become familiar as you type a class or object name, and see the resulting drop-down menu that lists
the members of each class.
1 There are other ways of terminating applications, such as Application.Exit
and End. These should mostly be avoided. See caution from Microsoft
here.
Now that we know how to display control objects on forms, we need to focus on how to get the data in those objects
(e.g. a TextBox) out of the control and into a variable. The answer to this is the same answer as most other answers
regarding objects; properties. We use the appropriate property to assign the data value to a corresponding variable.
Consider the following diagram:
The control object in this example is a TextBox used to obtain an input value, aptly named txtInput. The data
itself in the TextBox is part of the TextBox, but referenced, or accessed using the Text property, as is shown in
the diagram. Thus this data can be assigned to a variable of type String as follows (recall text in a TextBox is
of type String):
Events and Event Procedures
	Private Sub object-name_event (. . .) Handles . . .

	    ' code to be executed goes here

	End Sub
where the object-name is the Name property of the control object selected, and the event will be the
default event for that object (ignore the ellipses for now). So, if we had created a button control object on a
form, and named it (with the Name property) btnExit, double-clicking the button object would created the default
event procedure for the button object (i.e. a click event), which would look as follows:
	Private Sub btnExit_Click (. . .) Handles . . .

	    ' code to be executed when the Exit button is clicked goes here

	End Sub
It should be noted here that the object-name given to the event procedure is the exact name of the object at the
time of procedure creation. If you do not name your objects properly prior to creating their associated event
procedures, you will end up with procedure names that such as:
Private Sub Button1_Click (. . .) Handles . . .
which is not a very informative name for an event procedure. Attempting to remedy this after the event procedure is
created can also lead to problems. As a general rule, name objects correctly immediately upon creation, then create their
associated event procedures.
More With Objects and Properties
Properties set in the properties window at design-time are for the initial view of the form. This includes objects
like Labels, empty TextBoxes, etc. Object properties set at run-time are set in an event procedure when that event
procedure is fired. General syntax of object property setting is:
object-name.property = value
where object-name is the Name of the object, the property is the exact property you wish to set,
and where the value must be a valid, compatible value. For example,
	txtCity.Text = "Cincinnati"
	lblDisplay.ForeColor = Color.Blue
A few items of note:
Having said this, the following property assignment would produce errors:
txtZip.Text = 45236
Why? The value 45236 is not a string type, it is an Integer, and thus the error. If the value to be assigned is an
incorrect type, you can use the Convert method to perform type conversion and eliminate any errors.
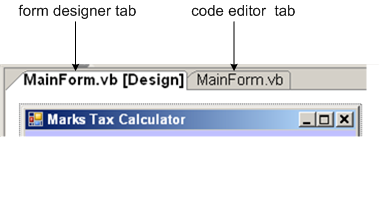
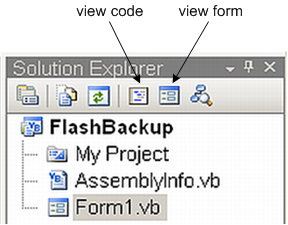
It should be obvious by now that form manipulation is done using the form designer window, whereas VB code is created
and edited in the code view window. One can easily switch between the two views in one of two ways, either using
the selecting one of the tabs in the center of the IDE, as shown on left below; or by selecting one of the two icons
in the Solution Explorer, as shown on the right below:
Introduction to Methods
form-name.Close()
However in actual usage, this is almost always implemented as:
Me.Close()
where the Me keyword provides a way to refer to the specific instance of a
class or structure in which the code is currently executing. You will use the Me.Close()
method to nicely terminate your Windows applications. Thus, coding the event procedure for the Exit button in
the application above would look like:
	Private Sub btnExit_Click (. . .) Handles . . .

		Me.Close()

	End Sub
Variables and Form Data
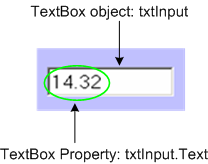
strInput = txtInput.Text
Note the use of the assignment operator (=) and recall that assignment always works from right to left.
Arithmetic operations are often performed on data input into a TextBox, so as with previous examples, converting
data from a TextBox may look as follows:
decInput = Convert.ToDecimal (txtInput.Text)
In this example, the String data from the TextBox is converted to an Decimal using the Convert method and assigned
to an Decimal variable. In general, operations other than conversion or formatting should never be performed
on control objects.
Problem Solving Revisited, Again
| Next Section: Conditional Structures | Table of Contents |
©2007, Mark A. Thomas. All Rights Reserved.