UNIVERSITY OF CINCINNATI
Department of Electrical and Computer Engineering & Computer
Science
Electronics Lab
SCR Power Control
PowerPoint Presentation
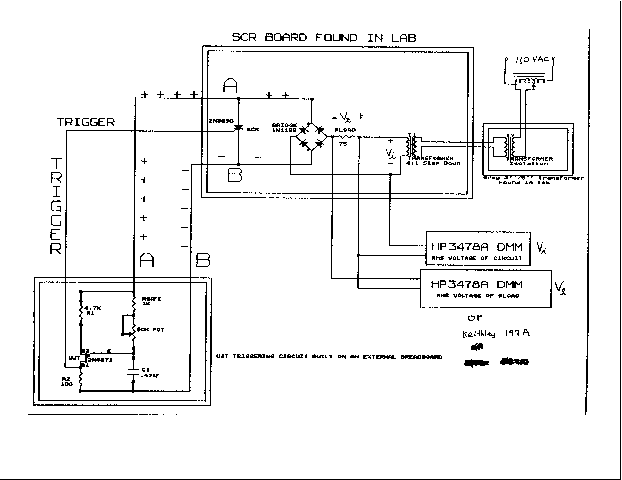
1.) With the SCR board unplugged and no power applied, measure
the value of RLOAD (approximately 75 Ohms).
2.) Set up the circuit of Fig. 1 excluding the UJT triggering
circuit and verify the following:
a) With the SCR shorted, i.e. point A connected to point B, the
input voltage Vi should read 20-30 Vrms and the load voltage Vl
should read 20-30 Vrms. CAUTION!: The load resistor should
get very  with the circuit connected in this way. Verify
that it is heating up and then turn off the power and disconnect
point A from point B.
with the circuit connected in this way. Verify
that it is heating up and then turn off the power and disconnect
point A from point B.
b) Reapply the power, and with point A not connected to point
B, the load voltage Vl should read nearly 0 V and the
input voltage Vi should still read 20-30V.
3.) Build the UJT triggering circuit as shown in Fig. 1. Do not
connect the circuit to the SCR board. Instead, apply a 10-20 VDC
voltage to it and verify that it will operate as a stand-alone
relaxation oscillator. Connect point A to the positive of the
power supply and point B to the common and obtain a dual trace
HP BenchLink Scope screen dump of the voltage across C1 as well as the
voltage across the 100 Ohm resistor with the DC voltage applied.
This step insures that the UJT relaxation oscillator will operate
as a trigger pulse generator when it is connected in the circuit.
Adjust the 50 K pot as necessary to force the circuit to oscillate.
4.) Remove the DC power supply from the UJT triggering circuit
and connect it as shown in Fig. 1 .
5.) Remove one of the two probes from the scope so that only one
probe is connected to the scope.
6.) Apply AC power to the circuit and set the value of Vi to 30
V by adjustment of the variable transformer.
7.) Place the scope across the SCR and observe that the conduction
angle changes as you vary the pot.
8.) Record the following in 10 degree increments of the conduction angle:
a) The RMS value of the load voltage, Vl, using a DMM.
b) The RMS value of the voltage across the SCR, using the scope
RMS measurement.
c) The RMS value of the input voltage, Vi, using a DMM. Use the
variable transformer to keep this voltage constant by readjusting
it at each new conduction angle.
WARNING: RLOAD gets very 
9.) Set the conduction angle to about 135 degrees. Obtain a scope screen
dump of the voltage across the SCR and the voltage across the
load resistor on the same scope screen.
CAUTION! You cannot connect scope probes across the SCR
and RLOAD at the same time without causing a short circuit and
possible scope damage. That is why only one scope probe is allowed
in this part. Instead use the scope's trace memory and trace storage
capability. Obtain one of the waveforms, store it, move the probe
and obtain the second waveform. Trigger from the line so that
the two traces will be aligned properly.
10.) Calculate and plot the following:
a) Measured and theoretical load power vs. conduction angle.
( Measured = Vl 2/RLOAD)
b) Vl and Vscr vs. conduction angle on the same set of
axes.