Fun with Deployment
- First, the book's first example uses dynamic downloading of classes. Don't mess with dynamic downloading just yet. That's one more layer of complexity. Let's take this one step at a time, and copy all needed classes in their appropriate directories from the start - server and client. This way we can test our simple system out and implement dynamic downloading once we have the other pieces working.
- As a matter of fact, with this simple example we're just passing Strings. We don't need to worry about copying that class, since it is part of the java.lang package. Later we'll make our own classes to pass. These custom classes will need to reside on both the client and server.
- Let's start this enitre application on one computer, then move to multiple computers. Be prepared to change the Naming URL in your client when you swith computers.
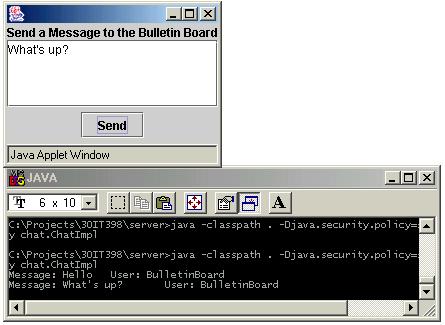
- My very first trial is a simple GUI client and no GUI on the server. The server prints out whatever the client sends it. The next step is to add the GUI bulletin board on the server as well.
- NetBeans tries to make some things easier on us. In some cases, this means changing what the book says. For instance, the duties of the *Server and *Impl classes that the book mentions are all in one class, the ClientImpl class. True object oriented design would tell us to put them in two classes, but simplicity leans toward one.
- I started the rmiregistry as instructed. Then, when I started the server, I got a message stating that port 1099 is already in use. This is the RMI port. When I looked at the generated code, I saw this:
- However, it needs more permissions to do this. It's late at night and I'm getting tired, so I did what I shouldn't do - I opened the server.policy file and gave it all permissions. But I will revisit this before class and give it the 'proper' permissions.
- Speaking of policy files, both client and server need policy files. It would not let me proceed because I had a few syntax errors. I did not have a semicolon after each entry, and I did not have one after the close curly brace. Once I have resolved the above mentioned All Permissions policy, I'll post a properly formed policy file for both client and server here.
- One major pain in the rear about command prompts. With RMI, it is easiest/best to run everything from the command line. Unfortunately, the command line is an inherently weak user interface, which really has nothing to do with Java. On some operating systems, including my Win Me machine at home, the output does not scroll. Thus, more often than not you cannot see the entire error generated. This makes debugging difficult!
- Keep in mind that RMI is most often used on multiple computers, usually at least one being a powerful server. Running an RMI client and server is entirely possible on one computer, since RMI is simply a protocol for communicating among JVMs. However, if you have a machine with very little memory (my 128 MB Win Me machine, for example), and other applications open, it may consume a fair share of resources.
- My first trial: client on top, server on bottom.
public static void registerToRegistry(String name, Remote obj, boolean create) throws RemoteException, MalformedURLException{
if (name == null) throw new IllegalArgumentException("registration name can not be null");
try {
Naming.rebind(name, obj);
} catch (RemoteException
ex){
if (create) {
Registry r = LocateRegistry.createRegistry(Registry.REGISTRY_PORT);
r.rebind(name, obj);
} else throw ex;
}
}
So NetBeans puts in the logic to start an RMIRegistry for us.
So I killed my RMIRegistry and proceeded with starting the server.
Next Step - Adding a GUI on the Server