University of Cincinnati-
ECE&CS Department
Microwave Communications
Prepared by: Prof.Altan M. Ferendeci
Circuit Simulation Guidelines using HP LIBRA
These brief introduction will provide some helpful guidelines in simulating a simple microwave circuit by entering a schematic, followed by simulation and finally by the display of the results. The procedure is similar to SPICE schematic capture program, but there are some major procedural differences. For more detailed description refer to the Libra manuals.
The circuit used here is a purely arbitrary ciruit presented here only to familiarize you in the using the LIBRA software.
- Log into the computer enter into LIBRA program.
- Open a Project Menu: Choose your old project directory or enter a new project name if it for the first time.
- Click on Schematic.
- Various steps in entering circuit elemnts are shown in the Figure below (Helpful comments are placed on the Figure).
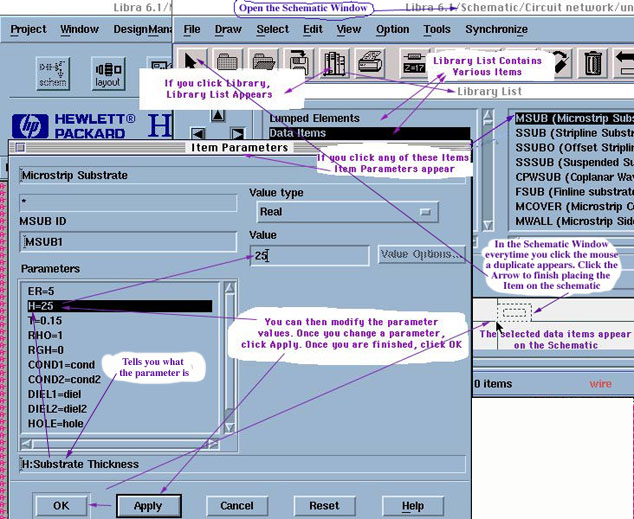
- Library contains all necessary circuit elements, data items, etc.
- Choose an Item from the Library list.
- For example:Data Items. Select Sub-category: i.e. MSUB (microstrip substrate).
- Item parameters appear.
- Modify your parameters.
- Click Apply, goto the next parameter, Once finished entering the parameter values, click OK. Do not click OK without clicking Apply.
- This places the Item and its parameters on the Schematic window.
- The Item appears highligted on the Schematic Window. By moving the mouse around, you can place the Item anywhere on the Window.
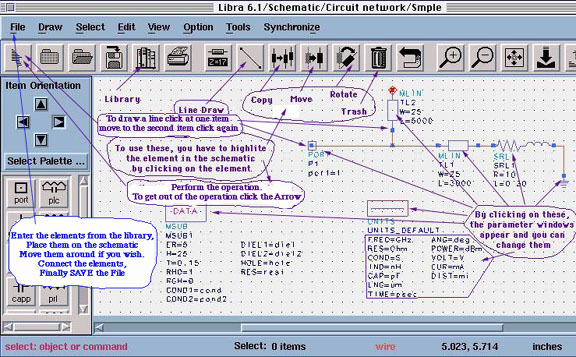
- If you click on the Mouse button, the item is plaed on the window. If you click the mouse a second time, a second copy is placed on the window. This is helpful if you are inserting multiple elements such as multiple microstrip lines. Be careful that you do not enter multiple items on the same location.
- Click the Arrow on the upper left corner to finish Item entry.
- You can change any of the parameters of a given Item by highlighting the parameter by double clicking on the Item.
- You can move the Items around and place them anywhere on the window.
- Once finished with the circuit, Save the File (in this example <Smple>).
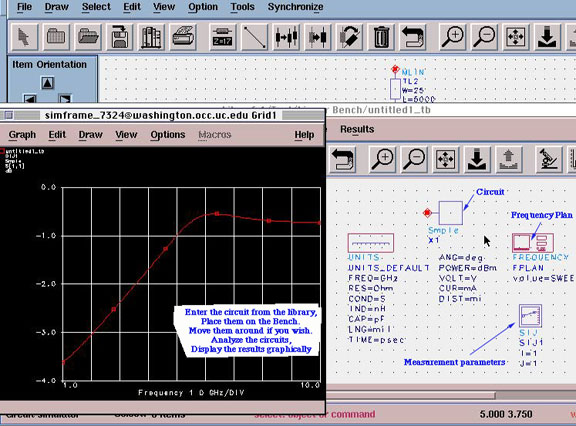
- Goto the Bench Window
- From the Library: Enter the Circuit <Smple> on the Bench. The circuit will show the number of ports that you have entered in the Schematic window. In this example: a one-port circuit.
- From the Library: Enter measurement parameters. In this example Scattering parameters (Only S11). IF you have multiple ports you can enter as many Sijs. You can change their subscropts by clicking on the Item and by making the required changes (for a Two port: S11, S12, S21, S22)
- Enter the Frequency Plan (Sweep or Single Frequency)
- Analyze the circuit
- Use the Results Menu for graphical representation of the results. (Linear, Smith Chart, etc.). You can change the display parameters through the Graph Menu. You can also introduce Cursors, etc, from the Option Menu.
You can go back to the Schematic Window and make any changes. Go back to the Bench, Analyze and Display will be automatically updated.
Back to Microwave Communications
Copyright; Altan M. Ferendeci, University of Cincinnati